

- Guide
Doing Programmatic with JobAdX Optimize
Here at JobAdX, we’ve done programmatic job advertising primarily through our ad exchange. The job ad exchange handles all the heavy-lifting by automating the entire advertising buying.
Now with JobAdX Optimize, you can have a more hands-on approach of job advertising with publishers you select.
In this guide, we’ll go over how exactly that looks and works on the platform. So buckle up as we begin the tour!
What is JobAdX ‘Optimize’?
As we mentioned, JobAdX Optimize was built to give you more control of job advertising on multiple channels.
The Optimize platform brings together hundreds of sites in one place for you to advertise your jobs. In addition, Optimize provides the tools to set various rules in place to keep your advertising spend controlled.
These rules can be set to specific sites, maintaining ad spend as long as it meets conversion rates, time duration, the list goes on.
The goal of Optimize is to better equip you with managing job advertising.
How does it compare to Exchange?
The main comparison of Exchange vs Optimize is time. Exchange is automatic all around, while Optimize does require users to set more things in place. This is the tradeoff for having more control.
On Optimize you will manually select which sites you want to advertise your jobs onto. While Exchange will automatically show your job ad whenever a good opportunity appears no matter which site.
To avoid the feeling of FOMO with this dilemma of which platform to use, you can actually select Exchange as a publisher using the Optimize platform. A ‘best of both worlds’ situation!
Visual Tour
Thank you for reading into my brief monologue. It’s time for the visual tour.
Getting Setup
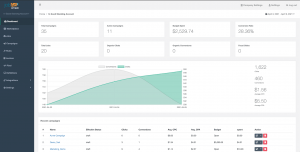
JobAdX Optimize Dashboard
Here’s a look at the JobAdX Optimize dashboard. The first you’ll see once you login into an account.
You’ll find a high-level overview of the performance of all your campaigns at the top of the dashboard. Total spend, conversion rate (an average representing all campaigns), the amount of certain types of clicks and total of campaigns are displayed first.
Directly under the account overview is a graph illustrating your conversion over time. The graph compares clicks vs conversions and will display the average cost per applicant and click on the side.
The bottom section lists all the campaigns you have created. With each campaign listed it’ll display it’s current status, budget, spend, clicks and conversions for you to take a quick glance at.
You’ll use this dashboard to keep track of everything that’s going on with all your campaigns and see how your overall performance has been. If things aren’t going well you can easily pinpoint which campaign might be the cause.
Creating a New Campaign
Let’s take a dive to see how these campaigns the dashboard keeps track of, are created in the first place.
We’ll jump into the “Campaigns” tab where we can see all our campaigns created and begin the campaign creation process.
Campaign Tab
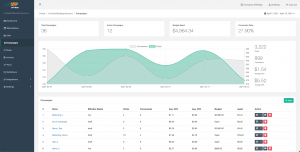
Campaign Tab
Create a Campaign Process
Once you click the “+ New” button, you’ll be prompted with a series of steps that’ll put your campaign all together.
The campaign creation process takes you through 5 steps:
1. Details
Naming of your campaign and setting our primary targets of success. This tells Optimize how many applicants per job and $ per applicant is considered a good job.
2. Add jobs
You’ve got the campaign set, now it’s time to add your job ads into it.
The add jobs portion will list all the jobs you’ve already uploaded into your account’s job inventory.
To upload jobs into your inventory, the Optimize platform provides a few options. The first being the traditional XML feed and the other common ATS integration. Optimize offers a Web Scrape option, where it will scan your career site and pull job ads from there.
Once the jobs are uploaded, select the ones you’d like to add to your new campaign and carry on the next step: Setting Rules
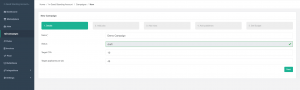
3. Setting Rules
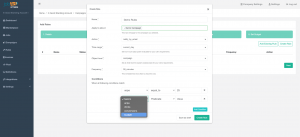
Our campaigns contain the job ads we want and now we can apply some rules to make sure we stay informed and within good standing.
With rules, we can tell our campaign to do things under certain circumstances automatically. We can have Optimize send us an email, stop the campaign or start the campaign when certain situations happen.
The factors Optimize can keep a track of with rules are Average CPA, Clicks, Conversions and Budget.
Once a rule is created it is saved to your account where you can reuse them again with other campaigns.
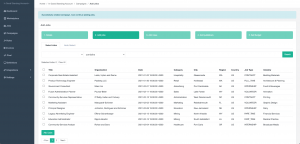
4. Selecting our Publishers
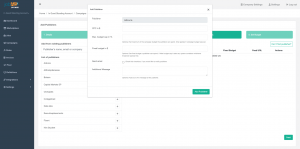
With job ads and rules set, we can select which publisher we want our job ads to show up on.
A list of partnered publishers will be listed that you can choose from. As you select each publisher, you will be able to set a specific CPC bid and budget with them. You also have the option to communicate with the Publisher to notify them you are sending them your job ads.
In case the publisher of choice isn’t on the list, you can select the “Can’t find publisher?” option where you can still do the same process to send your job ads to them. You’ll need to enter an email of a Point of Contact for us to get in touch with and integrate with your campaign.
5. Setting Budget
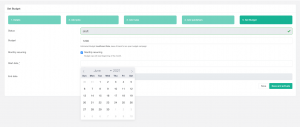
Our last step is to set a budget for the entire campaign. In the previous step, it’s an option to set specific budgets for individual publishers. For this step, it’ll automatically allocate budget for those publishers we haven’t established a specific amount of budget.
This step let’s Optimize know how much budget it works with for the month.
Once we select a start date and end date (optional), that finishes up our campaign process!
Extra Bells & Whistles
The core of Optimize lies within the campaign creating process. We have a variety of levers we can pull to make the most our job advertising campaign.
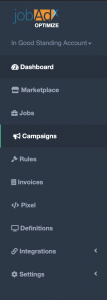
In the sidebar, we can find some extras that we may need to access every blue moon.
You browse our entire network of publisher sites under the “Marketplace” tab.
You can access our full Job Ad inventory under the “Jobs” tab, as well as our rules under “Rules”.
Under “Invoices” you can find the monthly payments due.
To access your conversion pixel (to track when applications are submitted), you can find your implementation instructions under “Pixel”.
This is Programmatic Lite
Thank you for coming on the Optimize tour! As you can see, JobAdX Optimize was designed to make programmatic simple. A lightweight platform built to tackle the heavy lifting of programmatic job advertising.
We’re open to showing a more personalized demo of the Optimize platform, reach out to us to find more details on that.
We’ll be more than happy to share our insights and tailor a campaign proposal with Optimize.
As always, Happy Hiring!